
Do you dread receiving markup from an editor or critique partner who uses Word’s Track Changes? Do you find it intrusive, or obscure? Afraid you might miss seeing that tiny change of a comma to a period?
Have no fear, Track Changes can be painless. Learn the basics and you’ll save time and money if you’re paying an editor.
Consider the alternatives: hard copy marked up by strange symbols from a red pen; a mishmash of color highlights, underlines and strikethroughs (one client of mine insisted on her own system, and it changed daily); or the bad old days of Word(im)Perfect.
Since Microsoft Word is here to stay, here are some tips to make it work for you. All the options start from the Review menu tab, in the Tracking and Changes sections.


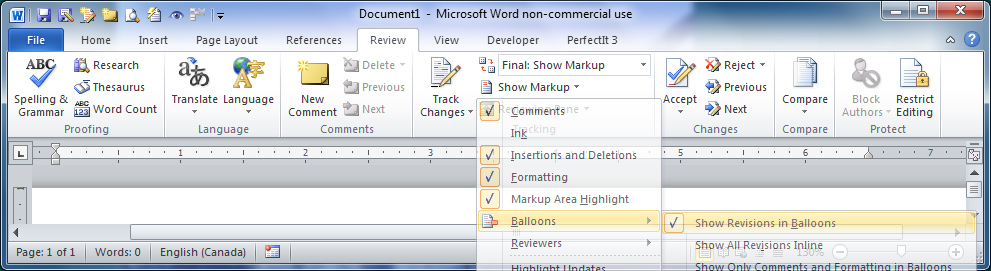
- Keep deletions out of the way, on the right-hand margin. Choose Show Markup > Balloons > Show Revisions in Balloons. (Note: Balloons appear in Print Layout view, not Draft or Outline view.) Insertions will remain inline, with the main text.
- Use blue for insertions (and red for deletions, if using Draft or Outline view). On the Track Changes icon, click the little down arrow. Select Change Tracking Options > Markup, to specify colors and other options.
- Next under Change Tracking Options there is a setting for Changed lines. Choose Outside border, and a vertical black line will appear in the margin to alert you to every change, however tiny.
- Deselect the viewing of format changes, to reduce clutter and focus on content. Choose Show Markup > (uncheck) Formatting. Toggle back on as needed.
- Accept or Reject changes efficiently. Click the arrow under the Accept button to Accept All Changes in Document. Or, for any portion of text, select that portion and click the main Accept (Ditto for Reject.) The rest of the document will be unaffected.
- Bonus tip: To compare two versions of a document, open a new (blank) document in Word, and use the Compare feature to load them together. Select the earlier version first, then the later version, and the differences will show as… Tracked Changes!
After a little practice using these tips, your revisions will become more pleasant, efficient, and professional.
—Nowick Gray is a writer and editor on Salt Spring Island.
http://NowickGray.com – http://HyperEdits.com
This article is reprinted from its first publication in the newsletter of the BC Federation of Writers, WordWorks (Winter 2019-2020), p. 22.
Credit: Screenshots by Ursula Vaira.